Hello Docs! We’ve made some fantastic enhancements to Dentostack’s patient management system, and we’re excited for you to explore them. Settle in with your favourite cup of coffee, and I’ll guide you through the new features on Dentostack’s dashboard, one step at a time.
We have made changes to easily detect unattended appointments; various documents can now include the doctor’s signature; and case summaries and prescriptions can now be clubbed and printed on one sheet.
Alerts for unattended appointments
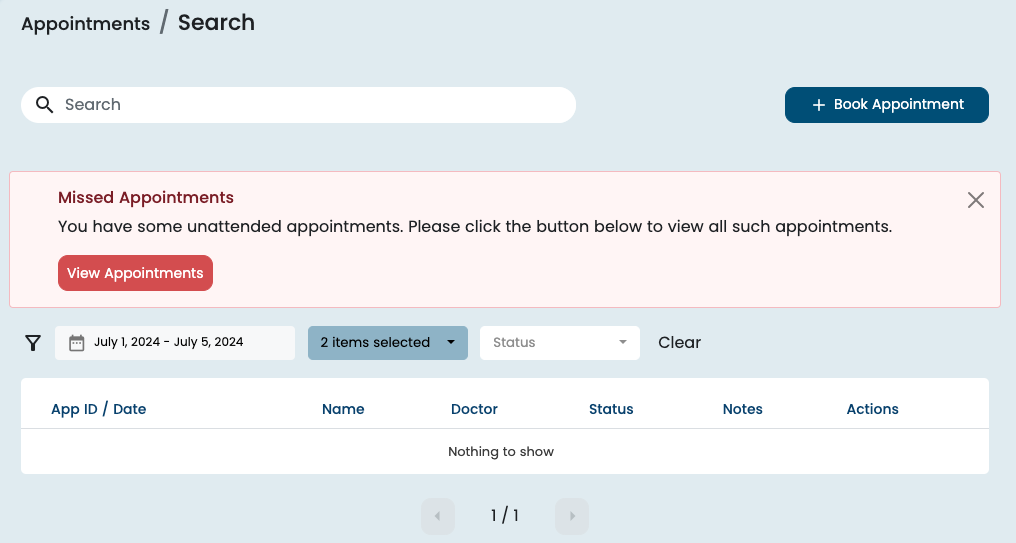
In the latest update, we introduced a way to easily detect unattended appointments. When a patient books an appointment, which the doctor missed to confirm, it leads to an unattended appointment. These appointments were not shown in the next day’s appointment dashboard unless a manual effort was made to adjust the date range of the appointment dashboard. This may result in the loss of potential patients.

We solved this problem by introducing alerts for unattended appointments. The system can now detect such appointments and show the alert in the appointment dashboard. And in one click, you can list down all unattended appointments. It is no longer necessary for you to keep track of these missed opportunities manually. You can now easily follow up with patients and reschedule missed appointments with the help of alerts.
Doctor’s Signature on Documents
This new feature allows doctors to upload their signatures to our secure dashboard. If the doctor switches on the required setting to use the signature on all documents, the signatures are automatically added to all supported documents. The supported document includes case summaries, prescriptions (Rx), invoices, and pre-treatment estimates.
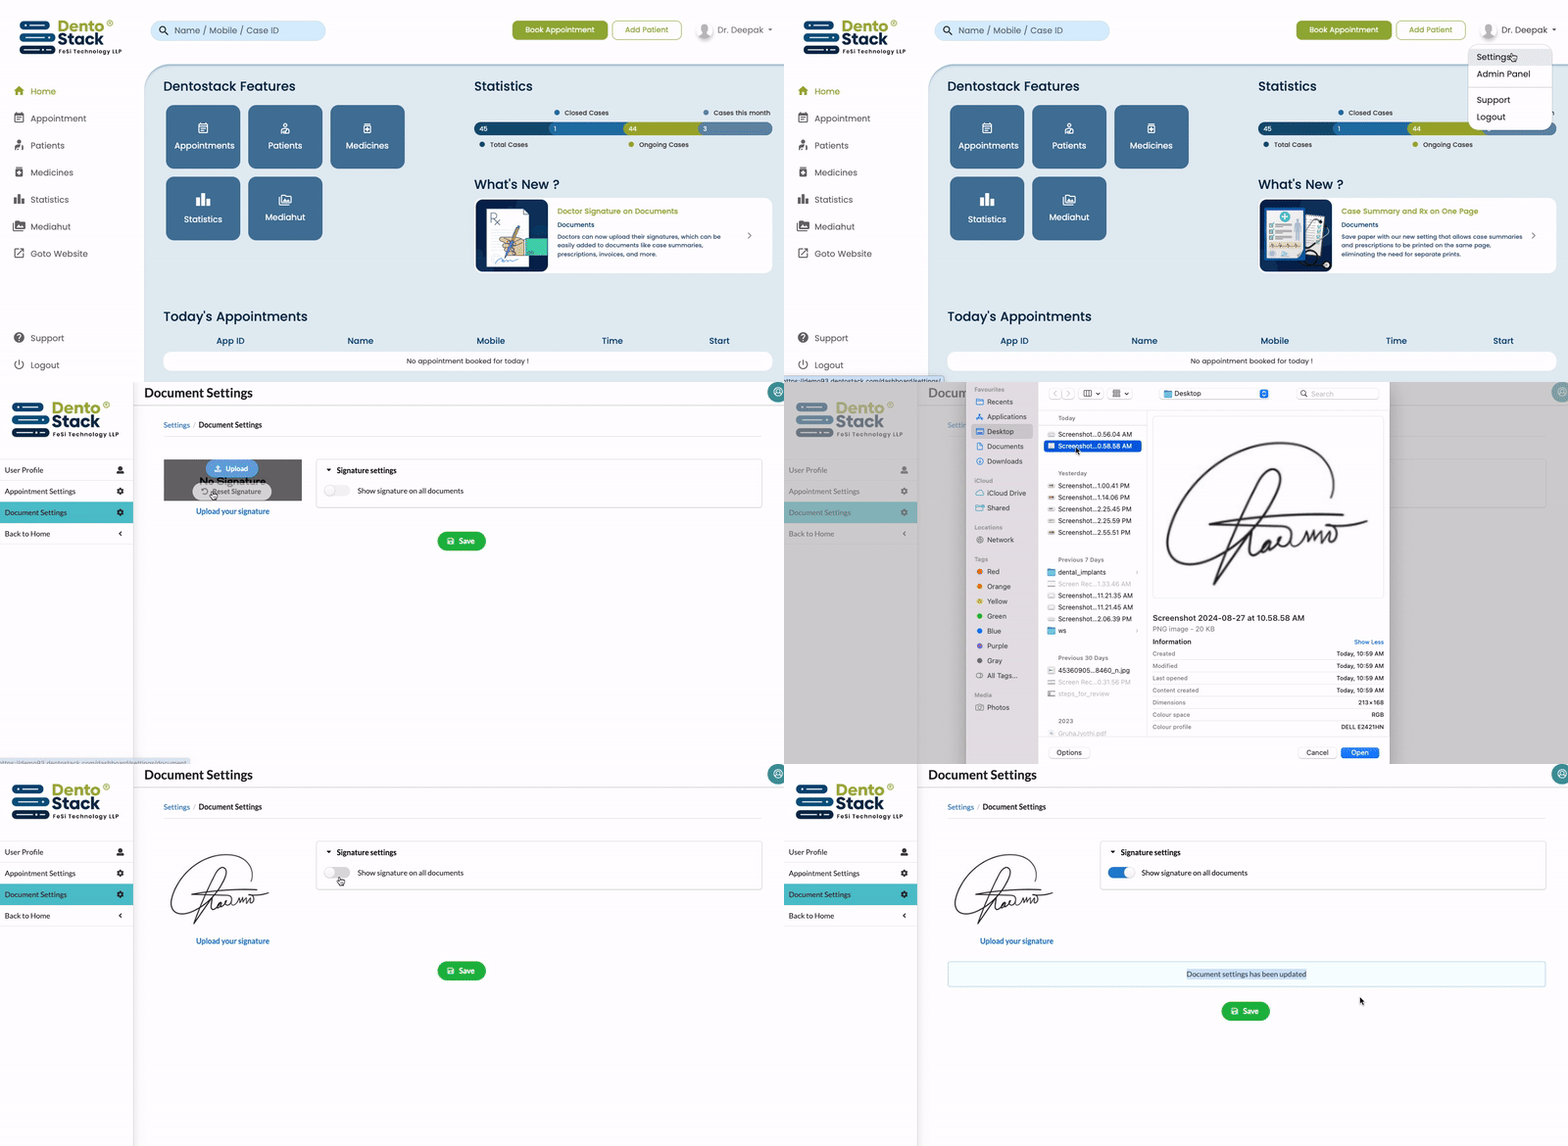
In a clinic where multiple doctors are working, each doctor can have their own choice to opt for this feature. To get started with this feature, one can use the following steps:

- Login and go to the home page.
- On the top right corner, you will find a menu by clicking on your user profile.
- Go to Settings and then click on Document Settings from the left side navigation menu.
- Upload your signature. It is recommended to upload a black-and-white signature image for best printing results.
- Enable the setting “Show signature on all documents” and hit the save button.
Combined Case Summary and Prescription
In Dentostack, a case summary and prescription are two independent documents. So, if a doctor wants to share printed copies of these documents, they need to print two pages. It is worth noting that each page remains empty up to 80%. The reason is that all these documents are printed on A4 pages, and the average number of medicines written in prescriptions is only 3 to 4 in a dental clinic. A similar pattern is seen for the case summary as well.
This gives us the opportunity to optimise the page utilisation by combining the case summary and prescriptions. Even if doctors want to share these documents over WhatsApp, email, or SMS. It takes only one message to send both the case summary and prescription to the patient. This feature can be enabled or disabled by adjusting the document setting from the admin panel. To get started with the feature, one can use the following steps:
- Login and go to the home page.
- On the top right corner, you will find a menu by clicking on your user profile.
- Go to the Admin Panel and then click on Document from the left-side navigation menu.
- Click Advanced Settings.
- Switch on the option “Merge Case Summary with Prescription” and hit the save button.
Know more about Dentostack
Visit dentostack.com to know more about dentostack and its services.
About the Author

Ekta Arya, Content Writer at Dentostack, is a versatile person who works as a soft skills and communication trainer. She handles everything while enjoying exercise, yoga, reading, movies, and music.
